Are the rising swine flu
casualties giving you jitters? Not sure how you can avoid falling prey
to the growing epidemic? First and foremost, there is absolutely no need
to panic.
Here are some easy steps you can take to tackle a flu virus of any
kind, including swine flu. It is not necessary to follow all the steps
at once. You can pick and choose a combination of remedies that suit you
best. However, if you are already suffering from flu, these measures
can help only up to an extent.
1. Have five duly washed leaves of Tulsi (known as Basil in English;
medicinal name Ocimum sanctum) everyday in the morning. Tulsi has a
large number of therapeutic properties. It keeps throat and lungs clear
and helps in infections by way of strengthening your immunity.
2. Giloi (medicinal name Tinospora cordifolia) is a commonly available
plant in many areas. Take a one-foot long branch of giloi, add five to
six leaves of Tulsi and boil in water for 15-20 minutes or long enough
to allow the water to extract its properties. Add black pepper and
sendha (salt used during religious fasts), rock or black salt, or Misri
(crystalised sugar like lumps to make it sweet) according to taste. Let
it cool a bit and drink this kadha (concoction) while still warm. It
will work wonders for your immunity. If giloi plant is not available,
get processed giloi powder from Hamdard or others, and concoct a similar
drink once a day.
3. A small piece of camphor (kapoor) approximately the size of a
tablet should be taken once or twice a month. It can be swallowed with
water by adults while children can take it along with mashed potatoes or
banana because they will find it difficult to have it without any
aides. Please remember camphor is not to be taken everyday, but only
once each season, or once a month.
4. Those who can take garlic, must have two pods of raw garlic first
thing in the morning. To be swallowed daily with lukewarm water. Garlic
too strengthens immunity like the earlier measures mentioned.
5. Those not allergic to milk, must take a glass of hot or lukewarm milk every night with a small measure of haldi (turmeric).
6. Aloe vera (gwarpatha) too is a commonly available plant. Its thick
and long, cactus-like leaves have an odourless gel. A teaspoon gel taken
with water daily can work wonders for not only your skin and joint
pains, but also boost immunity.
7. Take homeopathic medicines — Pyrogenium 200 and Inflenzium 200 in
particular — five tablets three times a day, or two-three drops three
times a day. While these are not specifically targeted at H1N1 either, these work well as preventive against common flu virus.
8. Do Pranayam daily (preferably under guidance if you are already not
initiated into it) and go for morning jog/walk regularly to keep your
throat and lungs in good condition and body in fine fettle. Even in
small measures, it will work wonders for your body's resistance against
all such diseases which attack the nose, throat and lungs, besides
keeping you fit.
Recommended By Colombia
9. Have citrus fruits, particularly Vitamin C rich Amla (Indian
gooseberry) juice. Since fresh Amla is not yet available in the market
(not for another three to four months), it is not a bad idea to buy
packaged Amla juice which is commonly available nowadays.
10. Last but not the least, wash your hands frequently every day with
soap and warm water for 15-20 seconds; especially before meals, or each
time after touching a surface that you suspect could be contaminated
with flu virus such as a door handle or a knob/handle, especially if you
have returned from a public place or used public transport.
Alcohol-based hand cleaners should be kept handy at all times and used
until you can get soap and warm water.
Yoga is an ancient practice followed and practiced by many around the
globe. It has benefited everyone who has regularly practiced the
age-old form of exercise. In today’s fast paced age, people look up to
yoga as a perfect exercise for a healthy body and stress-free life.
Practicing
yoga on a daily basis has certainly helped many people in reducing and
gaining weight. People often blame their genes for being overweight or
underweight. But that is not the case every time. It’s not always the
genetic makeup that is responsible for weight gain. Our lifestyle and
eating habits also play a negative role in weight gain. There is a lot
more you can do to reduce weight naturally. Power yoga is a healthy and
effective weight loss option. Yoga for weight loss for women is a
popular choice these days!
Yoga
can be the best and simple option for weight loss as it does not have
any side effects. It is a slow process and has long lasting effects. If
you want to lose weight in the natural way, always remember 3 D’s:
Discipline, Determination & Dedication. And yoga of course!
There
are various yoga asanas for weight loss. These include back-bending
exercises, standing asanas, sitting asanas and much more.
Yoga For Weight Loss – Top 27 Asanas:
1. Setu Bandh (Bridge Pose):
Image: Shutterstock
For
doing this, you have to lie down on your back and bend your knees in
such a way that your feet rests on the floor. Now the distance between
your feet & buttocks should be the same as your hands. Now, try to
lift your body in the upward direction. Try doing this 5-10 times &
then release. This asana gives a good massage to your thighs & lower
back.
2. Bhekasana:
Image: Shutterstock
Lie
on your belly and reach back to grab your feet as in bow pose. Now
through inhalation, lift up your chest and squeeze the shoulders towards
each other. Fold your feet towards the hip region and let your hands
hold the toes. Hold this pose for 5 breaths and then gradually release.
3. Dhanurasana:
Image: Shutterstock
This
is also known as Bow pose. All you have to do here is to lie down on
the floor with your belly touching the ground. Keep your hands besides
your chest. Now take a deep breath and lift your legs & thighs up.
At the same time, you have to try to catch your legs with your hands.
Remain in this position for 30 seconds & release
4. Shalbasana:
Lie
on your belly with your hands resting below your thighs while forehead
and chin are resting on the floor. Now try to raise your left leg up to
10 inches. Keep your leg straight. Do not bend your knees. After that,
try doing the same with your right leg too. At the final stage, do this
with both your legs.
5. Chakki Chalan (Grinding Pose):
This
is again a very effective exercise & asana for reducing belly fat.
For this, you have to sit in a comfortable position & spread your
legs straight in front of you. Both your legs should touch each other.
Do not bend your knees. After that join your hands & move it in
circular motion over your legs. This gives a good massage & stretch
to your stomach, hands & legs. Do it 10 times in clockwise position
& 10 times in anti-clockwise position. Release slowly.
6. Nauka Chalan (Boat Pose):
Image: Shutterstock
For
this, you have to sit down in a straight yet comfortable position.
Spread your legs straight in front of you. Your legs need to be joined
to each other. Do not bend your knees. Place your hands besides your
body. Now try to move your hands forward & backward. Also, move your
body in the same manner as you move your hands. They should move as if
you are riding a boat. Do it 10 times in clockwise position & 10
times in anti-clockwise position. Release.
7. Pavanmuktasana (Wind-releasing Pose):
Image: Shutterstock
Lie
down on your back in straight position. Now lift up your left leg &
bend it from the knee. Now, try to press your left leg towards your
stomach. Try to touch your chin to your knee. For this, you will have to
lift up your head a little. Try doing the same with right leg as well.
Once you successfully do this, try doing the same movement with both the
legs at the same time. This gives a good stretch to your stomach &
helps in reducing unnecessary fats.
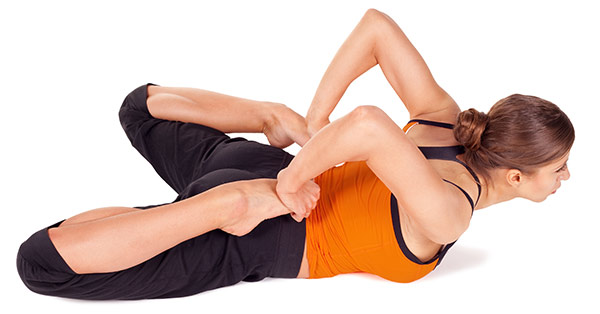
8. Ardha Matsyendrasana:
Sit
on the floor with your legs straight out in front of you. Bend your
knees, put your feet on the floor and then slide your left foot under
your right leg. Lay the outside of the left leg on the floor. Step the
right foot over the left leg and stand it on the floor outside your left
hip. Pressing right hand against the floor just behind your right
buttock, and set your left upper arm on the outside of your right thigh
near the knee. The right knee will point directly up at the
ceiling. Here, you have to exhale & turn towards the inner side of
your right thigh. Remain in this position for about 30 seconds &
then release. Try doing this the other way too.
9. Vakrasana:
Image: Shutterstock
For
this, you have to sit in a comfortable cross-legged position. Now, keep
your right hand on your left knee. Try to twist your body in the left
direction. Do not forget to keep your posture straight. Try doing this
in the right direction too.
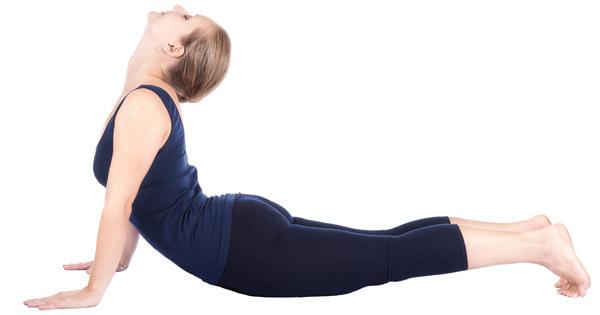
10. Bhujangasana (Cobra Pose):
In
this pose, you have to position yourself into a curved pose which
resembles a snake. Sleep on the ground in such a way that your forehead
touches the ground. Now place your palms under your shoulders in a
manner that it gets tucked close to your body. Stretch your legs in a
way that the top of your feet presses down into the mat. Now inhale
& slowly press your hands to stretch your arms, sending your chest
upwards. This pose looks like a snake & hence it is called the cobra
pose or the snake pose.
Stand
straight with your feet touching each other. Now exhale and bend
downwards from your hips to touch your feet with your fingers. Keep your
arms stretched in the whole process. Now slowly rise upwards and go
back to the first position.
12. Trikonasana:
Image: Shutterstock
Stand
straight, separate your feet wide apart. Now turn your right foot out
to 90 degrees & left foot out to 15 degrees. Ensure that you body’s
weight is balanced equally on both feet. Now bend your body to the right
side, downward from the hips. Make sure that you keep your waist
straight, thus allowing your left hand to come up in the air and your
right hand comes down and touches the ground. Try to keep both the arms
in a straight line. Repeat on the other side. Trikonasana stretches the
sides of your body. It tones your arms & thighs. It also improves
the flexibility of your body.
13. Paschimottanasana:
Image: Shutterstock
Sit
down on the floor with both legs extended forward in front of you.
Stretch your arms and body forward and try to touch your toes. Do not
bend your knees & try to reach your toes. This asana gives a good
stretch to your hands, arms & your spine. Also, it reduces extra
belly fat & keeps your healthy & free from diseases.
14. Shirshasana:
Image: Shutterstock
While
doing this asana, you have to first sit down on the floor in Vajrasana
position. Now place your hands on the ground in such a manner that you
will be able to hold your left arm with the right hand & the right
arm with the left hand. Now try to place the crown of your head in
between your palms. Now try to take your legs slightly upwards. This is
known as Ardha Shirshasana. Try balancing it this way. After you
successfully learn balancing, then try to move your legs in the upward
direction in a straight line with your body. Remain in this position for
30 seconds & release. Always remember, the right way to come out
from any asana is the way you enter into it.
15. Sarvangasana:
Image: Shutterstock
This
is also known as shoulder stand. Here, you have to first lie on a mat
& rest your back on the floor. Then you have to try lifting your
legs in the upward direction. You can even take the support of your
hands for the same. Try to rest your hands on your back so that they can
help you remain steady in the position. Now, once your legs are up in
the air, try to bring them in a straight alignment with your body &
stretch it as much as you can. Stay in this position for 30 seconds
& then release.
When
you are steady in the Sarvangasana pose, try and bring your legs
downwards from over your head. Again here, rest the palm of your hands
on your back in order to support your position.
17. Tadasana(Mountain Pose):
Image: Shutterstock
This
is popularly known as the mountain pose. Here you have to stand
straight on a mat. Now, you have to put your hands up & stretch it
as much as you can. Try to keep your hands straight. This gives a good
massage to your hands, back, spine and the whole body. This is the most
recommended asana for increasing height as well.
18. Warrior Pose:
Image: shutterstock
This
asana is popularly known as ‘Virbhadrasana’. For this, you need to
stand straight and then move your feet about 4 inches apart from each
other. Raise your arms up in the air & stretch them. Now turn your
right leg to 90 degrees on the right side & accordingly turn your
left leg in the same direction & stretch it. Keep your back
straight. Look upwards towards your hands facing the sky. Repeat this
asana 10 times daily. It is an effective weight loss technique.
19. Uttitha Hasta Padangustana:
Image: Shutterstock
Stand
straight in Tadasana position. Now try to lift up your left leg in the
upward direction. Now try to touch the ankle of your left leg with your
left hand. Try it the other way too. Do not stretch beyond your
capacity. This asana gives a good massage to your spine, lower back,
hips, legs & hands. It also helps in reducing the fat in these areas
of the body.
20. Garudasana:
Image: Shutterstock
Stand
straight in Tadasana position. Bend your knees a little. Now try to
lift up your left leg and wrap it around your right leg. Do the same
with your hands. Now try balancing in this position. Remain steady for
10-15 seconds & release. This asana helps in reducing extra fat in
the thighs & your arms.
21. Vasisthasana:
Image: Shutterstock
Stand
in the Plank position. Now roll both the heels to the right so that the
outer foot is touching the floor. Stack the left foot on the right
foot. Now press down your right hand and raise the left hand by
inhalation. Stay in this pose for about 5 breaths. Now release the pose
and get back to plank pose by exhaling
22. Ardha Chandrasana:
Image: Shutterstock
Stand
in a straight position. Spread your legs wide apart. Now turn your
right foot outside in a 90 degree position. Try to touch your hands,
palm to the ground in a straight line with your feet. Now, lift up your
left leg and try to stretch it up in the air as much as you can. Do not
stretch beyond your capacity. Now lift up your right hand & stretch
it up in the air. Remain steady for 30 seconds & release.
23. Utkatasana (Chair Pose):
Image: Shutterstock
Stand
in Tadasana position. Stretch your hands up in the air. Now bend your
knees and try to keep your thighs parallel with the floor in the same
manner in which you sit on a chair. Stay in this position for 30 seconds
and release. This will help you in reducing fat from the arms and
thighs.
24. Side-Bend Asana:
Stand
in a straight position. Keep your hands beside your body & leave it
loose. Now simply turn towards your right side. Do not put any pressure
on your body or your hands. Just stretch from your side as much as you
can. Try it in both the directions. This will help you get rid of the
unnecessary fat on your side.
25. Tittibhasana (Fire Fly pose):
Image: Shutterstock
This
pose combines the arm balance pose and the forward bend, an arm balance
and a hip opening pose. Settle into a wide squat. Bring your palms flat
on the floor just under your feet. Bend the elbows back into Chaturanga
Dandasana (Four-Limbed Staff Pose). Shift your weight back to rest on
your upper arms and bring the feet off the floor. Straighten the legs
and then your arms into the final posture. Hold this asana for 10
seconds daily and build it over time to One minute.
26. Ardha Chakrasana – Half Wheel Pose:
Image: Shutterstock
This
is a side stretch and is a great way to melt away those love handles.
It is also an excellent way to tone your lateral muscles. How To do:
Stand on the yoga mat with the feet joined together, with the toes and heels touching each other.
Allow your hands to rest on your waist; make sure that your thumbs point towards your spine.
Taking a deep inhalation, slowly bend backward until you experience the tingle on your spine.
Make sure your knees are straight.
Hold the pose, breathing deeply, until you finish counting 20 slowly.
Exhaling and then inhaling, slowly release your body from the pose and relax in the initial position.
This makes one repetition. Repeat 3 to 5 times.
27. Adhomukha Svanasana – Downward Facing Dog Pose:
Image: Shutterstock
Along
with helping you tone your tummy and give you an enviable arms and
hamstrings, this yoga stretch has countless other benefits too. How To do:
Stand on your yoga mat straight, your feet resting firm and flat on the yoga mat.
Keep your spine erect.
Allow your hands rest alongside the body with your palms resting on your thighs.
Indulging
in a deep inhalation and then exhaling slowly, bend frontward in such a
way that your palms could rest on the yoga mat spread out at the width
of the shoulders.
Make sure that your fingers are spread out.
Let the face down, the gaze fixed on the floor.
Stretch out your legs, one each, towards the back, spreading out at shoulder width.
Let the hands and feet be aligned.
Keep the knees and elbows straight.
Taking a deep inhalation, suck your abdomen completely in such a way that your navel and spine are close to each other.
Hold the pose, indulging in deep breathing for about a count of 60.
Exhaling gently, release your body from the pose and relax.
This makes one repetition. Repeat7 times, taking a pause of 10 seconds in between repetitions.
Pranayama:
These
yoga postures for weight loss can undeniably help in losing extra
pounds and make you look slimmer. But it is more effective when done
along with pranayama. Pranayama is a breathing exercise which involves
controlling your breath. While practicing pranayama, follow the below
mentioned steps:
Take a deep breath. Now close your right nostril
with the thumb of the right hand. Inhale with the left nostril &
exhale with the same. Try breathing with both the nostrils one by one.
Always inhale slowly. This helps in clearing the nasal passage. Those
having breathing problems have to consult a doctor before practicing
this. You can also practice anulom-vilom which means alternate breathing
exercise.
Yoga is considered as an effective weight loss option
as it is a mixture of warm-up exercises, asanas & breathing
techniques. Pranayama increases metabolic rate and hence, burns your
calories at a much faster rate. It generates heat in your body &
also increases blood circulation.
Dietary Habits:
Diet is
an important component while practicing asanas & pranayam for weight
loss. One of the best aspects of yoga is that diet is a main part of
it. After you have lunch, you can practice yoga after a gap of 4 hours.
You have to control your food intake. You also have to follow a specific
diet plan which will help in reducing unnecessary calories. Yoga and
breathing exercises should always be performed on empty stomach.
After
you finish with the weight loss yoga session, always chant ‘Aum’ or
‘OM’ 11 times loudly. The vibration that it creates gives you a pleasant
feeling & keeps your body rejuvenated throughout the day. Also,
this chanting can be done in the beginning of a yoga class along with
prayers & mantras.
Are you planning to include yoga to lose weight in your workout? Then do try these above mentioned tips, asanas & breathing exercises for weight loss. Happy practicing!
Enrique Miguel Iglesias Preysler, better known as Enrique Iglesias, was born on May 8, 1975 in Madrid, Spain. He is a Dream Guy of many gals in the world. Girls love him because he sings very romantic songs which make him chocolaty and hot among gals.
Enrique started his musical career on Mexican label Fonovisa. Thru this label, he became famous in Latin America and in the Latino or Hispanic market in the US. He stood as the biggest seller of Spanish language albums for a number of years. Enrique is also very famous in countries like Iran, Saudi Arabia, India, European countries where English is not their first language.
aenrique-iglesias-vivir
Enrique Iglesias and Vivir: 1995-98
Enrique Iglesias released his first album titled Enrique Iglesias, on July 12, 1995, a collection of light rock ballads. Mega hits such as “Si Tu Te Vas”, “Experiencia Religiosa” was among the mega-hits of the album. “Por Amarte”, “No Llores Por Mi”, and “Trapecista” topped the latin charts. Enrique won a Grammy Award for Best latin performance that year. In 1997, Iglesias’ luck continued to rise with the release of Vivir (meaning To Live), with put him up with other English Language music superstars in sales for that year.
Enrique-Iglesias-Cosas-Del-Amor-
Cosas del Amor: 1998-1999
This was his third album released in 1998. He won an American Music Award against Ricky Martin and Los Tigres de Norte.
Enrique_Iglesias_Escape
Enrique and Escape: 1999-2002
Enrique’s soundtrack, “Bailamos”, in Will Smith’s movie Wild Wild West became a number one hit in the US. “Could I Have This Kiss Forever”, “Sad Eyes”, “Be With You” became all time super-hit songs. In 2001, he released the album Escape. The first single of the album, “Hero”, became a number one hit in the UK, and many other countries. Escape his biggest commercial success to date. The songs “Escape” and Don’t Turn Off The Lights” became very popular.
Quizas
Quizas: 2002-03
In 2002, Enrique released his fourth Spanish language album titled Quizas.
eiglesias7
7: 2003-06
Iglesias released his seventh album, which he called 7, in 2003.
enrique-iglesias-insomniac
Insomniac and Greatest Hits: 2007-2009
Insomniac was released on June 12, 2007. Songs like “Push”, with rapper Lil’ Wayne, as well as “Ring My Bells” was among the great hits of the album.
Enrique Iglesiass - Euphoria
Euphoria: 2010-present
On July 5, 2010, Enrique released his ninth studio album, Euphoria.
Enrique is the most romantic, most chocolaty and most beloved pop-star!
Marshall Bruce Mathers III, better known by his stage name EMINEM, was born on October 17, 1972. Eminem is the most popular rapper around the world. He is a rapper, actor and record producer. He was born in Saint Joseph, Missouri, United States. EMINEM’s popularity is now not restricted only to USA or North America, he has become the King of Rap for the whole world.
EMINEM quickly gained popularity in 1999 with his super hit debut album, The Slim Shady LP, which won a Grammy Award for Best Rap Album. The very next album, The Marshall Mathers LP, became the fastest selling solo album in United States history. The Marshall Mathers LP and his third album, The Eminem Show, also won Grammy Awards, making EMINEM the first artist to win Best Rap Album for three consecutive LPs. He then won the award again in 2010 for his album Relapse in 2010 for his album relapse, giving him a total of 11 Grammys in his career. In 2003, he won the Academy Award for Best Original Song for “Lose Yourself” from the film, 8 Mile, in which he played the lead.
EMINEM has always been surrounded by controversies and that’s what made his songs so famous! His personal life has been challenging for him all thru his life. He was married twice to Kimberley Anne Scott. In 2000, Scott attempted suicide and sued EMINEM for defamation after he depicted her violent death in his song “Kim”. They first divorced in 2001 but remarried in January 2006. Their second divorce was finalized in December of the same year.
EMINEM
EMINEM and legal troubles have very close relations. In 1999, his mother sued him for around US$10 million. Mathers was arrestd on June 3, 2000 during an altercation at a car audio store in Royal Oak, Michigan, with Douglas Dail, where he pulled out an unloaded gun and kept it pointed at the ground. He has also faced many problems regarding drug issue. EMINEM has conflict with pop singer Mariah Carey. He has written several songs referring to their relationship. His best song referring Mariah is ‘Superman’. It is awesome. Eminem is an aggressive destructive man. Nobody dares to mess with him. If you dare to mess with him, you will be there in his next songs as his **** or *** or whatever! He likes his enemies to be on his songs.
The Recovery, EMINEM’s latest album, had sold 2.7 million copies, as of September 29, 2010, in the US after his release in June 21, 2010. Not Afraid and Love The Way You Lie are two most super hit songs of this album. EMINEM’s songs are highly energetic and with powerful lyrics. EMINEM and Rihana have a sequel of their hit single, “Love the Way You Lie”. I love EMINEM because his songs encourage, inspire and encourage me. From his every song, he seems to tell us how to be brave in the worst situations of life. He has not become EMINEM overnight. He has suffered a lot and has sacrificed many things to become what he is today. He truly inspires me a lot.